When it comes to productivity, Google has a plethora of tools to offer. Among these is Google Drive, the tech giant’s cloud storage for personal and working needs. As part of the G Suite, Drive promotes collaboration through the use of collaborative tools embedded in the storage service. We’re giving you some Google Drive tips to make you more efficient and productive, especially to those who are currently using it for sharing files at school and work. Most of the procedures can be done through the web browser.
Table of Contents
Cloud-based storage such as Google Drive requires you to have a stable WiFi connection on your desktop and mobile devices. But in case that you need to work remotely on areas without a WiFi connection or work on something during long flights, you could still view and edit Google documents through its offline feature.
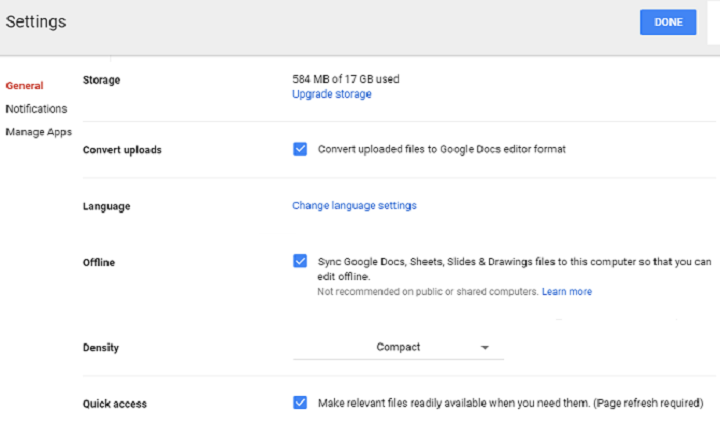
Step 1: Install the Google Docs Offline Chrome extension on your PC/laptop.
Step 2: Go to Google Drive, click the gear icon, then select Settings.
Step 3: In the Offline section, check the ‘Create, open, and edit your recent Google Docs, Sheets, and Slides files on this device while offline’ box.
Step 4: Save changes made by clicking Done.
Step 5: Right-click a file and turn on ‘Available offline.’
Note: This is a one-time setup per device. You may now open and edit Google Docs, Sheets, and Slides files stored on the Drive offline.
To access recent files offline on your mobile device:
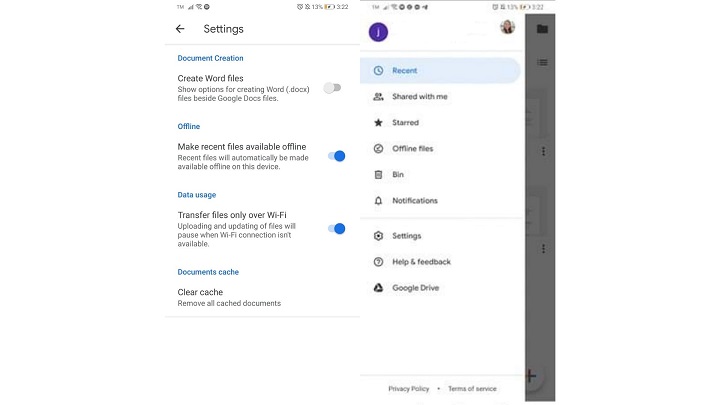
Step 1: Open the Google Docs, Sheets, or Slides app on your Android or iOS device.
Step 2: Tap the menu icon on the upper left part, then tap Settings.
Step 3: Turn on ‘Make recent files available offline.’
Aside from making it attractive and more engaging, changing the theme of your shared drive can help you navigate folders easier. You may pick or create a theme on the shared drive provided that you have manager access on it. You may also change the color of the folders on your Drive.

Step 1: Under ‘Shared with me’ on Google Drive, click a shared drive.
Step 2: At the top next to the shared drive name, click the down arrow, and then select the ‘Change theme.’
Step 3: Pick ‘Gallery’ to select themes from Google’s catalog. Should you want to upload your design, click the ‘Create custom theme.’
Step 4: Click the picture of the theme you want or navigate and click a custom image.
Step 5: Save changes by click ‘Select.’
To change the color of a shared folder
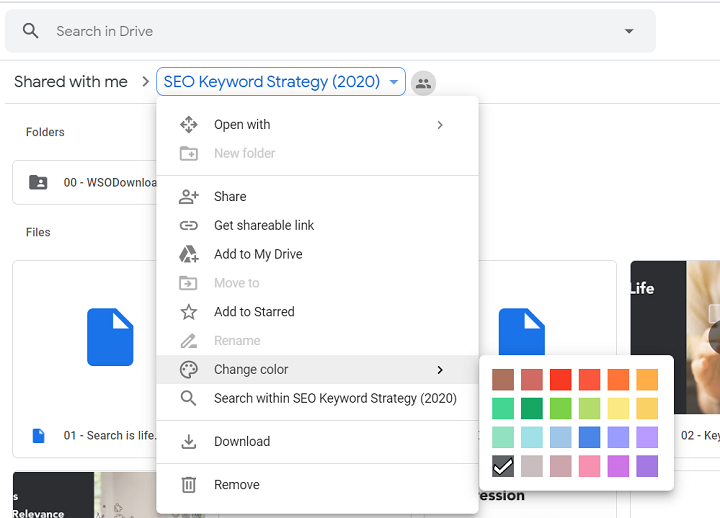
Step 1: Under ‘Shared with me’ on Google Drive, click a shared drive.
Step 2: At the top next to the shared drive name, click the down arrow, and then select ‘Change color.’
Step 3: Select the color you want to apply.
Ideal for those working in international organizations or students with foreign language classes, this feature directly translates documents written in other languages to your native language.
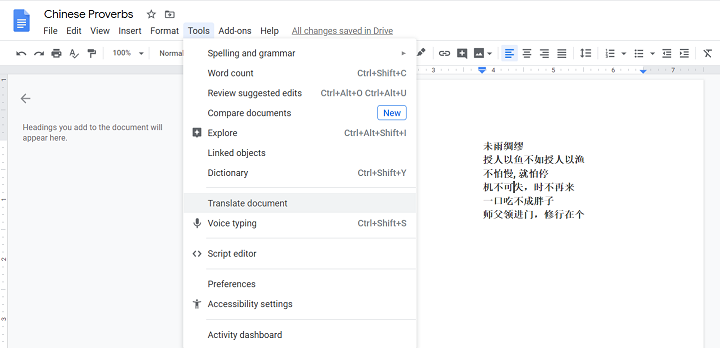
Step 1: Open the word document in Google Drive.
Step 2: Go to Tools located in the upper part of the page then choose ‘Translate document.’
Step 3: In the dialog box, name your translated copy of the document and select your native language.
Step 4: Click ‘Translate.’ The translated document will automatically appear on a new tab.
Note: The translation only works with word documents and might not be 100% accurate, so we still suggest to seek help from language dictionaries.
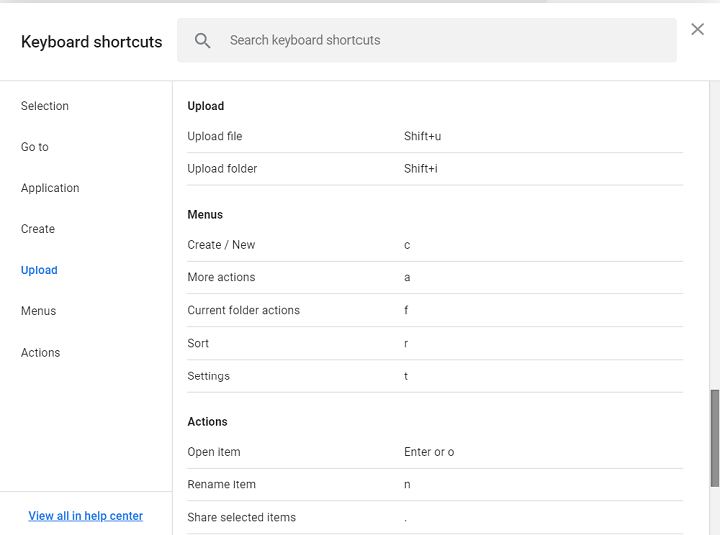
To save time and effort from creating, editing, and uploading previous and new files on the Drive, you may use the keyboard shortcuts embedded in the cloud storage service. The list provides basic to complex control, encompassing customization of files to file uploads. There are two ways of displaying the keyboard shortcuts panel. The easiest one is by pressing ‘?’ or ‘Ctrl + /’ or. You may also click the gear icon located at the top left part of the page and choose ‘Keyboard shortcuts.’
Do you need to scan and upload important documents on the go? Worry no more because Google Drive got your back. With your Android smartphone, you can scan receipts, customer files, and other important documents on the go and save it in PDF format across connected devices on Google Drive. It’s easy as pie, isn’t it?
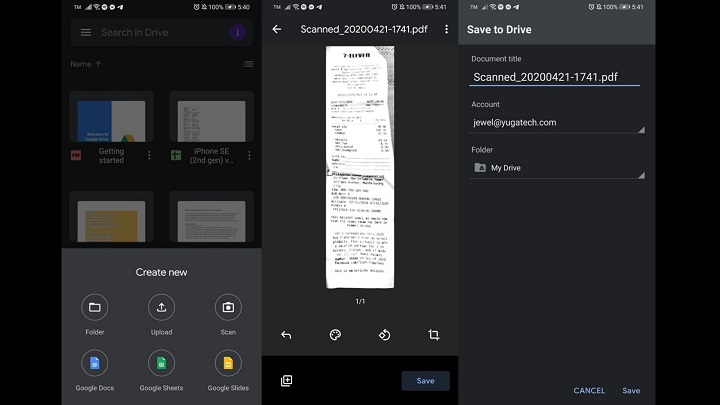
Step 1: Open Google Drive on your phone and tap “+” on the lower-left corner.
Step 2: Select Scan from the menu and allow the Drive to access your phone’s camera.
Step 3: Take a photo of the document.
Step 4: Make adjustments and crop the image right after you snap a photo of the document.
Step 5: Hit the ‘Save’ button. You may rename the document before uploading the file to the Drive.
Note: This feature is exclusively available to Android devices.
Spending a long time downloading files over the web and uploading it to your Drive? Through the Save Google Drive Chrome extension, you won’t need to wait forever. It allows users to save links, web pages, images, and HTML 5 photos and videos in HTML, MHT, Google Doc, and PNG formats on the fly.

Step 1: Download and add the Save Google Drive extension to your laptop/PC.
Step 2: Search photos and pages to your web browser.
Step 3: Right-click the photo or left-click Chrome extension to take a screenshot of the web page you want to save on your Drive.
Step 4: Log-in your Google account to allow the upload of the file straight to your Drive.
Step 5: Rename the file and hit ‘Close.’ The file will automatically upload and appear on your Drive.
When followed correctly, this feature grants administrative controls and ensures seamless synchronization of downloaded files from your computer to your Drive. This improves network bandwidth and frees up more space on your desktop. This procedure that we’re about to discuss applies to laptops and PCs running on Windows 7 and onwards.

Step 1: Download and install Drive File Stream. You may refer to this link for the full instructions.
Step 2: On your computer, go to the ‘Downloads’ folder (usually in C: > Users > your user name).
Step 3: Click ‘Drive File Stream’ then choose Open Google Drive Folder.
Step 4: Drag the ‘Downloads’ folder into the Google Drive folder.
Step 5: Open Chrome. In the top-right corner, click ‘More’ and then ‘Settings.’
Step 6: Click ‘Advanced’ and go to ‘Downloads.’
Step 7: Choose ‘Change’ and in the pop-up, navigate to the ‘Downloads’ folder that you dragged to your Google Drive folder and click ‘Select.’ This selection is now your default download location.
Note: The Drive File Stream is also available to Mac devices. You may open this link to see the instructions.
Available in the G Suite subscription, this feature helps organizations and students in taking down the minutes of the meeting or online lectures from professors. It records the active speaker and anything that’s been shared in the Google Meet platform. For added security, an email with the recording link is sent to the meeting organizer and the person who started the recording. The recorded meetings would be stored directly to the Drive under the Meet Recordings folder.
To share a recording via Google Drive
Step 1: Select the file and click ‘Share’ or ‘Link’ and paste the link in an email or chat message.
Step 2: Select the file and click ‘More’ and then ‘Download.’ Double-click the downloaded file to play it.
Step 3: In Drive, double-click the recording to play it. Wait until the file is ready for online viewing.
Step 4: To add a recording to ‘My Drive,’ select the file and click ‘Add to My Drive.’
Note: For best results, download the recording and then play it from your computer. Live captions won’t be recorded and don’t appear when you play the recording.
Can’t keep up to the meeting and tired of writing notes? Google Drive got you covered. With Docs, users can use the voice typing capabilities to automatically type what is dictated to or heard by your laptop/ PC’s microphone. For better results, make sure that your microphone is working properly.

Step 1:Go to Google Docs and click ‘Tools’placed above the ruler margins. You can also press Ctrl + Shift + S in Windows or Command + Shift + S in Mac.
Step 2: Select ‘Voice Typing. A window with a microphone icon appears. Set your chosen language by clicking the dropdown box above the mic icon.
Step 3: Click the window to activate the said feature.
Note: The feature is only available when Google Docs is opened in the Chrome web browser.
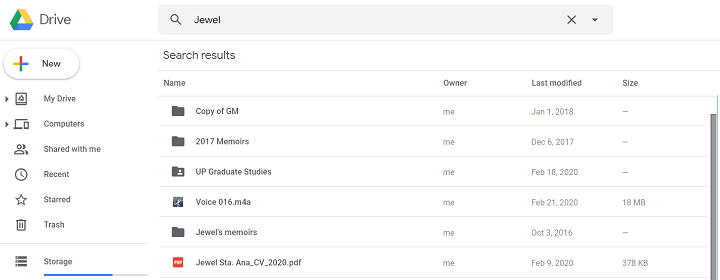
Finding a specific file on your Drive can be cumbersome, especially if you don’t remember its file name. Luckily, Google Drive is powered by machine learning, which features smart searching. This means that it reveals all the documents and photos that reflect the keywords in the search bar. All you need is to type it in the search bar and hit the ‘Search’ icon.
If you have reached this part, then kudos to you! You just unlocked some new productive skills in using Google Drive. Make the most out of your account and share it to others. Did we miss something else? Let us know in the comments below.

YugaTech.com is the largest and longest-running technology site in the Philippines. Originally established in October 2002, the site was transformed into a full-fledged technology platform in 2005.
How to transfer, withdraw money from PayPal to GCash
Prices of Starlink satellite in the Philippines
Install Google GBox to Huawei smartphones
Pag-IBIG MP2 online application
How to check PhilHealth contributions online
How to find your SIM card serial number
Globe, PLDT, Converge, Sky: Unli fiber internet plans compared
10 biggest games in the Google Play Store
LTO periodic medical exam for 10-year licenses
Netflix codes to unlock hidden TV shows, movies
Apple, Asus, Cherry Mobile, Huawei, LG, Nokia, Oppo, Samsung, Sony, Vivo, Xiaomi, Lenovo, Infinix Mobile, Pocophone, Honor, iPhone, OnePlus, Tecno, Realme, HTC, Gionee, Kata, IQ00, Redmi, Razer, CloudFone, Motorola, Panasonic, TCL, Wiko
Best Android smartphones between PHP 20,000 - 25,000
Smartphones under PHP 10,000 in the Philippines
Smartphones under PHP 12K Philippines
Best smartphones for kids under PHP 7,000
Smartphones under PHP 15,000 in the Philippines
Best Android smartphones between PHP 15,000 - 20,000
Smartphones under PHP 20,000 in the Philippines
Most affordable 5G phones in the Philippines under PHP 20K
5G smartphones in the Philippines under PHP 16K
Smartphone pricelist Philippines 2024
Smartphone pricelist Philippines 2023
Smartphone pricelist Philippines 2022
Smartphone pricelist Philippines 2021
Smartphone pricelist Philippines 2020