A celebrated photographer by the name of Chase Jarvis once said that “the best camera is the one that’s with you”, and nowadays that camera will most likely be the one on your smartphone. Somehow, most of us don’t fully utilize our smartphone’s camera capabilities yet and end up with run-of-the-mill snaps, potentially losing the chance to capture precious yet fleeting moments in our lives.
With that being said, the YugaTech team lets you in on five best practices that you can do to improve the pictures you take using your smartphone, starting with having a good grasp of your smartphone’s imaging capabilities.

Be one with your tool
In order to get the most of what you have, you need to have a good understanding of what your smartphone camera can and cannot do. Oftentimes, users end up with crappy shots because they were using their device in ways it was not intended to or they’re just too lazy to tinker with various settings on their smartphone’s camera app and expect their device to magically do it for them.
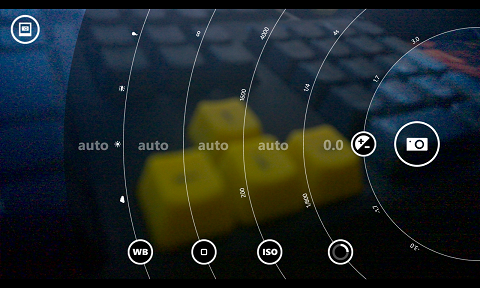
Start by familiarizing yourself with your smartphone camera app. Unlike full-fledge cameras, there are only a handful of ways that you can alter the settings of your smartphone’s camera. Use this to your advantage and identify what these various settings mean and how it affects your picture.

Once you know the ins and outs of your camera app, start experimenting with various settings and see what happens to your pictures if and when you change a particular setting. As a good practice, take note of the changes you’ve made before you take the shot so you can refer to it later on.
Don’t be shy in taking more than one picture of the subject or scene. There are a lot of benefits in doing so, one is having a backup in case your first shot ended up bad and the other is having the ability to compare the shots that you took using different settings.
Lastly, take a closer look at the pictures you’ve taken, preferably on a bigger screen than what your smartphone has. Observing how your camera behaves in different lighting conditions and various scenes can help you better understand the limitations of your device.
Think before you click
We often see this adage pertaining to how we interact on the internet, but it’s also applicable to smartphone photography. Sure, there are times when we need to be quick in order to capture fleeting moments, but in most cases it’s better to first take a step back and think of ways to better capture the subject or scene.
Here are some sample questions that you can ask to yourself before pressing the shutter:
Look for better angles
Oftentimes, we are so excited to take picture of something or someone that we forget that there are other ways to shoot the scene or the subject. This is exactly the reason why most pictures taken at iconic places look similar to thousands of other pictures taken on that particular place.

Before you press the shutter button, take a second or two to circle around the place or the subject to find interesting angles. Better yet, take a bunch of pictures of the same subject in various angles to see what angle looks best.
Hold it STEADY!
Nothing is more annoying than a blurry picture. Sometimes it’s the camera’s fault for using a slower shutter speed to counteract the insufficient light source, but most of the times it’s actually the user who can’t keep the phone steady while taking the picture.
While we can’t do much about how your camera behaves in different lighting conditions, we can do something about reducing, if not totally eliminating the blur caused by our shaky hands. Here are some ways we can do just that:
Zoom with your feet
Shooting with your smartphone is like shooting with a DSLR camera with a prime lens (What is a prime lens?) in a sense that it forces us to use the available focal length of our smartphone’s camera. Sure you can always opt to “zoom in” digitally, but unless you’re using a PureView 808 or a Lumia 1020, I think we can all agree that you wouldn’t want to go down that path.

So what do we do? Zoom with our feet, rather than zoom with our camera. Not only will your shots be clearer and crisper compared to when you digitally zoom your camera, but also allow you to get up close and personal with your subject.
Conclusion
There are ton of things that you can do to improve the pictures you take with your smartphone, but the five aforementioned tips should be a good starting point to take your smartphone snaps from good to great.
Tell us what you think about our tips and feel free to share your own tips (if you have any) on the comments field below.

YugaTech.com is the largest and longest-running technology site in the Philippines. Originally established in October 2002, the site was transformed into a full-fledged technology platform in 2005.
How to transfer, withdraw money from PayPal to GCash
Prices of Starlink satellite in the Philippines
Install Google GBox to Huawei smartphones
Pag-IBIG MP2 online application
How to check PhilHealth contributions online
How to find your SIM card serial number
Globe, PLDT, Converge, Sky: Unli fiber internet plans compared
10 biggest games in the Google Play Store
LTO periodic medical exam for 10-year licenses
Netflix codes to unlock hidden TV shows, movies
Apple, Asus, Cherry Mobile, Huawei, LG, Nokia, Oppo, Samsung, Sony, Vivo, Xiaomi, Lenovo, Infinix Mobile, Pocophone, Honor, iPhone, OnePlus, Tecno, Realme, HTC, Gionee, Kata, IQ00, Redmi, Razer, CloudFone, Motorola, Panasonic, TCL, Wiko
Best Android smartphones between PHP 20,000 - 25,000
Smartphones under PHP 10,000 in the Philippines
Smartphones under PHP 12K Philippines
Best smartphones for kids under PHP 7,000
Smartphones under PHP 15,000 in the Philippines
Best Android smartphones between PHP 15,000 - 20,000
Smartphones under PHP 20,000 in the Philippines
Most affordable 5G phones in the Philippines under PHP 20K
5G smartphones in the Philippines under PHP 16K
Smartphone pricelist Philippines 2024
Smartphone pricelist Philippines 2023
Smartphone pricelist Philippines 2022
Smartphone pricelist Philippines 2021
Smartphone pricelist Philippines 2020
weryou@ says:
Add ko na lang din…
Experiment with ISO settings.
Take note of the lighting condition.
Remember the “one third” rule.
Know when and when not to use flash.
asdas says:
ulul ISO settings as if kayang ma adjust manually ang iso ng mga smartphones.
hoi! says:
hoi troll, mas ulol ka. hindi mo ba alam na pwd? hays. bago mag comment ng masama, mas mabuting alamin muna. keep it up!=)
mon says:
Opo, naa.adjust ISO sa setting ng camera ng android smartphone. Wag na mag away plz, peace ????
anony says:
add ko lang din
take time in post processing.
there are so many great photo apps in the market such as snapseed,pxlr, vscocam and more.
huwag yung add lang ng add ng filter..adjust exposure and sharpness etc
weryou@ says:
+1 sa snapseed and pxlr.
Easy E says:
What are your suggested photography apps para ma”adjust” ang ISO etc
Doyle says:
Try Pureshot or 645 Pro Mk II (available on App Store)
nice says:
yong manual focus importante din.. if available on your device..
Silverlokk says:
More tips on keeping your phone steady while shooting:
Brace yourself against a wall or tree or pole, anything that will keep you steady
Take a deep breath before hitting the shutter button
Keep your phone as close to your chest if possible
Of course, those tips depend on other factors, e.g., in the absence of a wall or pole, you don’t need to look for one if your position is already otherwise idea.
Silverlokk says:
… otherwise *ideal.